Guac!

Everyone has their own version of guacamole.. but mine is the best. And I know it something that a lot of people think is really hard to mess up, but it’s not. You have to know the perfect ratios for each ingredient! I’m going to share with you a guacamole passed down from generations (jk.. my mom makes good guac tho).

This guac is great for anything! By itself, on some nachos (see pic), and just this morning I added it to my vegan scramble breakfast burrito (recipe to come once I get that damn seasoning down). Alright, let’s get on with it..

GUAC!

Ingredients

2 perfect avocados (if you don’t know what a perfect avocado looks like what are you really doing with your life…)

1 jalapeno, minced

1/4 of a normal size red onion, chopped

Hand full of chopped cilantro

The juice of 1 lime

1 tsp. garlic powder

1 tsp. red pepper flakes

Salt N Pepa

Sooooo this is going to be the quickest recipe but it needs to be shared. Basically, you want to mix all of the ingredients up. But there is a process.

First, you want to chop up your avocados, and I mean chop in to like quarter inch squares. I like to cut my avocados in half, remove the pit, peel off the skin, and the chop them up. But to each their own. Place your chopped avocado in a bowl and add your jalapeno and onion. Now you will want to start incorproating it all together with a big fork. Mush it down a bit, stir it up, mush it down, stir it up. As Bob Marley would say… STIR IT UP! You will want to do this until you have a chunky but creamy avocado mix.

Then, add the rest of your flavors including the chopped cilantro, lime, garlic powder, red pepper, and salt N pepa. Nicely mix that all up. You did it! Now you have some bomb guac to eat with whatever your little heart desires. Don’t for get to do a quick taste test and add any other seasonings to enhance that green, fatty goodness. Cheers!

(And yes, I know, I need to get my nails done.. it’s happening today!)

img_9962.jpg

DARK Chocolate Chip & Ancho Chile Cookies

Yes, they’re vegan! Thanks to the future Father in Law for this recipe. They have just a hint of heat but are soooo moist (you are welcome to everyone who hates that word)! Using applesauce as the egg substitute reminds me of my Grandma’s apple sauce cookies that are TO DIE FOR. So perfectly chewy. Try these out and let me know if you added anything to kick it up a notch!

DARK Chocolate Chip & Ancho Chile Cookies

Ingredients

2 and 1/2 cups flour – we used a little bit of whole wheat flour because I ran out of the regular stuff

2 tsp smoked ancho chile powder (plus some more to sprinkle on top if you like the heat)

1 and 1/2 tsp fine sea salt

1 and 1/2 tsp baking soda

1 and 3/4 cup coconut sugar

1/4 cup brown sugar

1/2 cup coconut oil (or vegan butter – again we ran out of coconut oil and improvised)

1/4 cup apple cider, preferably from beautiful Apple Hill if you are in Northern, CA. Save the rest and mix it with Sierra Nevada Pale Ale for some delicious cider beer.

2 tbsp applesauce

A bag of vegan dark chocolate chips

If you’ve ever made cookies before you know the first step is to preheat the oven. So crank that shit up to 350 degrees. Spray down a baking sheet with a little non-stick cooking spray.

Next, in a shmedium bowl, whisk together your flour, chile powder, sea salt and baking soda. In a larger bowl, mix together the coconut and brown sugar then add the coconut oil or butter (vegan please!), cider and applesauce. Stir all that sugary goodness up for about 2 minutes until it’s super blended. Add your flour mixture a little bit at a time and continue to stir.

After you have mixed it up and it looks a little runny, add a little bit more flour until you get a real nice doughy texture. If it’s too dry, add a bit of almond milk (just a tbs or two). Now that you have this fantastic dough, add your vegan dark chocolate chips. Eat a few. Add the rest 🙂

Finally, form your dough into 1-inch balls and put them on your pan. OR just plop some cookie looking forms on the pan like I do. This is an important step.. Add some ancho chile on top for that extra kick. You can’t taste it too much in the batter, so if you want a little heat, add it on top. Then cook those babies for about 10 to 12 minutes. Repeat with the rest of your dough to make about 36 cookies to share with your family and friends! (or forget to share them and eat them all to yourself.. either way, I wont judge)

Green Mac N’ Cheez

So you saw the Mac N’ Cheez recipe. Right? You didn’t? Well go freaking look at it over here. Rude. Anyways, this is GREEN Mac N’ Cheez made with avocados. We just like kicking our dishes up a notch up in here. This would probably be perfect for St. Patty’s Day with your whiskey. BUT it’s delicious year round, especially as it is starting to get cold!

My 5 year old ATE and LIKED this recipe. He is the pickiest person I know, so you know it’s gonna be good, and kid approved!

GREEN Mac N’ Cheez

The Green Ingredients

2 avocados

1 cup cilantro

1/2 cup basil

1 tsp garlic powder (eh.. add a little more)

A little bit of paprika

Salt

Lemon juice (about 1 lemon needed)

First, throw all this stuff in a food processor and mix it up for a few minutes until it’s all creamy. Hold on to that for a minute.

Once that is all mixed up, start cooking some of your fave macaroni noods. Read the directions.. you know how to do that.

The Cheez Ingredients

2 tbs olive oil

2 tbs flour

3-4 garlic cloves (minced)

1 and 1/4 cup UNSWEETEND almond milk

1/4 cup nutritional yeast

Heat up your olive oil and flour until it starts to brown a little. I’m pretty sure this is called a rue, but I could be wrong. Mince up that garlic (I don’t know about you but mincing garlic is like my therapy.. it really relaxes me. I also love garlic), throw it in to the rue, and mix it up. Then add your almond milk and nutritional yeast. Let all of that simmer for just a few minutes. NOW add you avocado mix that you were holding on to. Mix up your cheez mix and your avocado mix all together heating them a bit as well.

Take your cooked macaroni and throw it in to the pan of green delicious good. Make sure that tasty stuff is well incorporated all up in that macaroni.

Now, you can stop here and eat it how it is, or you can be a bad ass and take it up a notch.

Grab some arugula and throw it in your macaroni mix. The peppery flavor and greeny texture adds a whole other element. We also added some chopped up cherry tomatoes and red pepper flakes.

FINALLY, this is a must, make some vegan parmesean and add it on top. I did this with the leftovers the next day and, damn, was it good. I used Minimalist Bakers recipe, but there are tons online. Basically cashews and nutritional yeast.

Enjoy!

IMG_9860

Mac N’ Cheez

As a new vegan, the one thing that I’ve really been missing is bacon. I have YET to find a good vegan bacon. If you find one. Holler at your girl.

This recipe isn’t about bacon. I just wanted to share that with you. However, another food group I thought I was going to miss, was cheese. I’ve always loved cheese. Melty, creamy, tasty.. CHEESE! But alas, that stuff comes from cows and that is gross. So vegan cheese. Some brands, not so bad, others, taste like cardboard.

This Mac N’ Cheez recipe, does not taste like cardboard. It tastes like creamy, melty, tasty… CHEESE! Try it out..

MAC N’ CHEEZ

Ingredients

1/3 cup coconut oil

1/4 cup nutritional yeast

4 tsp dry mustard

1 tbs tomato paste (side question: what do you guys do with all the leftover tomato paste? Every recipe calls for only, like, 1 tbs but you have to buy a whole can!)

2 garlic cloves, minced

Ss. Ss. Ss. Salt and Pepas HERE

Just a splash of turmeric

4 and 1/2 cups UNSWEETENED almond milk

About 3 cups of chopped up cauliflower (almost a whole head)

1/2 cup of raw cashews

Macaroni

1 carrot

1 zuchini

1 broccoli

1 bell pepper (pick your fave color!)

Olive oil

FIRST, heat up your COCONUT OIL (accidently used olive oil the first time – it worked – but use coconut oil) in a pretty large pan, until it’s all shiny and new over medium heat. Stir in your nutritional yeast, mustard, tomato paste, garlic, SALT, and turmeric. Cook that shit up until it’s smelling all goooood (only like 30 secs). THEN, stir in you UNSWEETED almond milk and bring it to a simmer. FINALLY, stir in your cauliflower and cashews, reduce the heat a bit, cover it a little bit, and let it simmer and cook about 20 minutes. OR until the cauliflower is very soft.

While that little mixture is cooking up, chop up your veggies! Actually, before you chop up your veggies, preheat your oven to 400 degrees, we all know that shit takes forever. Anyways, the carrot and zuchini can be chopped up in to little veggie coins as Mike would call them. Chop up your broccoli and bell pepper as well. Throw your chopped veggies in to a bowl and dress them up with a little olive oil, salt, pepper, and red pepper flakes if you are feeling feisty. Place them on a baking sheet and bake for 15 to 20 minutes, checking and flipping them around half way.

You can also cook up your macaroni, you beautiful, vegan mac n cheez maker, you!

Once your cauliflower/cashew mixture is all soft and done, work in batches to blend it up. You SHOULD use a food processor. We have a Nutribullet, so it took us a lot longer, and we struggled a bit, but we did it. When you have blended all that creamy freaking goodness together, taste it. Ours was a little bland and I needed to add more salt, but it was so magical after that. Then mix it with your cooked and drained macaroni in a big dish you can throw in your oven for a few. Sprinkle some breadcrumbs of your choice on top of your cheezy mixture, and some parsley for good luck.

Take your tasty veggies out of the oven when they are done and turn it on broil. Throw your oozy, cheezy, beautiful mixture in the oven for about 5 minutes. You might need a little more time but you want it nice and crispy on top (see pic below). Once it is crispy and cooled, get yourself a nice big spoonful and throw it in a bowl. Toss some of your veggies on top, and voila! Bon apetit.

IMG_9700

Fckin Fried Chkin

This is crazy. We’ve seen a few recipes for vegan fried chicken online and had to try it. It was an experience, let me tell you. We had no idea what was going to happen and the process made us feel like mad scientists. So if you want to have some cruelty-free fun, try this shit.

Fckin Fried Chikn

Ingredients

The chikn –

1 and a half cups of vital wheat gluten

1 tsp garlic powder

1 tsp onion powder

A hint of cumin (less is more according to Mike, who can smell and taste cumin from a mile away)

Couple pinches of salt and pepper

A dash of chili powder

1 cup cold water

2 tbs. soy sauce

2 tsp. Worcestershire

A couple splashes of Crystal’s Hot sauce

To begin, combine all of your dry ingredients in a large bowl. That means you gluten, garlic powder, onion powder and other spices. Then, mix all of your wet ingredients in another small bowl. Add more hot sauce if you like your chikn spicy. Can you guess what is next??? Add your wet ingredients to your dry ingredients and start to mix it up with a wooden spoon. Once it is all mixed together, dig your hands all up in there and knead the dough a couple of times. It’s shocking how fast it turns to dough.

Next you are going to want to separate the dough into about six equal-ish parts. With each piece, try to knead it and stretch it out as much as you can. The thinner the better at this point because they are about to expand. And you might think they will just get a little bigger. Wrong! They are going to get big. Believe me.

So after you have your strange looking stretched out dough things. You are going to boil them. Didn’t think that was the next step, huh? Yep. Grab yourself a big pot and add 5 cups of water, 2 tbs of soy sauce, 2 tsp of Worcestershire, and some Crystal’s hot sauce for flava. Add your dough nuggets to the water and bring that weird stuff to a boil. Once it’s boiling, turn your heat to low-ish and simmer those strange masses for 60 minutes flipping halfway through. This is what it is going to look like half way through…

IMG_9721

Brains, right? Wrong. You are making seitan by the way. Google it. Full of protein for all those questioning where vegans get protein from.. here is one source.

After you flip those puppies you can start to put your dredge together.

The dredge –

1 cup (maybe a little more) UNSWEETENED almond milk

2 tbs (maybe a little more) flour

Mike’s girlfriend’s Crystal’s hot sauce

1 cup flour

1/4 cup nutritional yeast

2 tbs cornmeal (eh.. optional. But it makes it super crunchy)

1 tbs baking powder

Little tiny bit of cumin

2 tsp garlic powder

1.5 tsp onion powder

Some salt and pepper

1 tsp paprika

I think we added some cayenne for a little heat too.

Anyways, you know the drill. Mix your almond milk, 2 tbs flour, and hot sauce together in a bowl big enough you can dunk one of your nuggets in. The texture should be slightly creamy but mostly liquidy. So if you need to add more flour, do it. Or more almond milk, do it. Trust your judgement.

In another bowl mix together the 1 cup of flour, cornmeal, nutritional yeast, and all of your spices.

After your chikn brains after been simmering for 60 minutes, take them out and place them on a paper toweled plate to drain. Once drained and a little cooler, start frying em up!

Fill a frying pan with about 1/2 inch of vegetable oil. Then 2 at a time, take your seitan (chikn brains) and dredge them first in the almond milk mixture, then in the flour/cornmeal mixture, then in the oil. It should take about 2 minutes per side to get all brown and crispy. Continue this process with your remaining seitan. Place crispy ass fried chikn on a plate with paper towels to collect remaining oil.

Finally, sprinkle with a little parsley to make it look all fancy and enjoy with your favorite sides, or on a sandwich, or by itself. We had some oil-free sauteed garlic brocolini and baked potatoes! I would recommend adding some more Crystal’s hot sauce on top of the chikn for good measure. Enjoy!

Ps.. would not recommend storing in the fridge over night and microwaving it the next day for lunch and adding it to your salad. Not chill.


Everyday Smoothie

I drink this smoothie almost every day. Hence the name. It’s easy, filling, full of protein, and pretty health AND tasty. I use my beloved Nutribullet and sometimes customize the recipe to what I have available at home. Here is the basic recipe, feel free to add or discard what you wish!

Everyday Smoothie

Ingredients

Half of a banana

About a cup of frozen blueberries (I just tend to pour some in)

Maybe some strawberries if you are feeling fun

About 3/4 cup of UNSWEETEND almond milk (no need to add those extra sugars, you’ve got blueberries!

Handful of spinach

1 tbs. chia seeds

1 tbs. hemp seeds

And/or 1 tbs. pumpkin seeds

1 tbs. almond butter (I like Trader Joe’s Natural Almond Butter)

This is probably going to be the easiest recipe that I have, but I know vegan peeps are always looking for new ways to switch up their regular quickie breakfast smoothies. You are going to want to add everything to your Nutribullet or blender in the exact order that is listed above. Trust me! It will taste like shit if you don’t. And, say you add your almond butter before your seeds.. all your seeds are going to stick to the spoon and then you’ve wasted your precious seeds. They’re expensive. Don’t do that.

See..

IMG_9747

Anyways, you add all your tasty shit listed above to your favorite device that stirs things up. Turn it on and watch it go for about 2 minutes. If it’s still a little thick, add a splash of water and stir it up again. Pour it in your fave glass and nourish up!

Crunchwrap with “Queso”

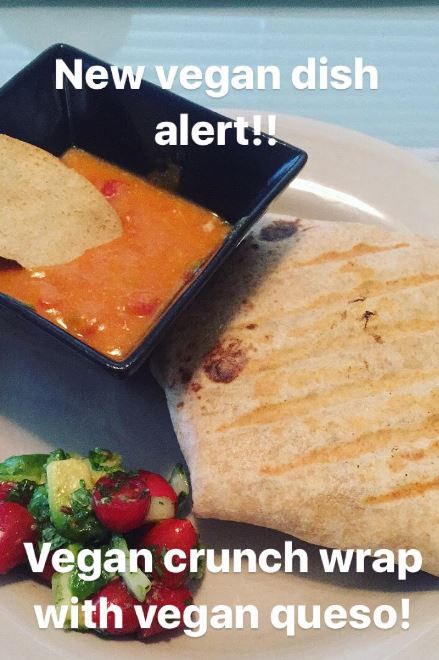
If you didn’t know already, Taco Bell has a vegan menu. They screw up your order half the time, but it’s possible to get some tasty taco bell options with black beans and fresco which removes the chesse n crap and adds pico de gallo. It’s a good option if you are on the road and short on time. Anythings tastes bomb with their delish hot sauces too. One of their options is the Crunchwrap with black beans and the pico de gallo. It’s not bad. But we thought we could try to make it ourselves, and it kind of worked!

We also added a side of vegan queso (brought to you by Thug Kitchen) that actually kind of turned in to a delicious squash soup because someone, I wont name any names (cough*MIKE*cough), added too much canned diced tomatoes. I literally ate it like a soup the next day for lunch. So follow this recipe to make the queso, or a delicious soup. Info on the crunchwrap to follow.

Butternut Squash Queso-ish Dip (courtesy of Thug Kitchen) or a delicious Butternut Squash Soup

Ingredients

1 and 1/2 cups butternut squash puree (canned or you can skin and chop up a butternut squash into chunks, steam them in a pot until tender, then throw them in the food processor.. or your Nutri-Bullet. We really need to invest in a food processor)

1/2 cup diced yellow onion

3 tbs whole wheat flour

1 and 1/2 tsp ground cumin (Mike’s favorite)

1 tsp chili powder

1 tsp smoked paprika

3 tbs olive oil

1/2 cup veggie broth or water

1 cup dice tomatoes with their juices (You can use a can for this. If you are following the Queso recipe, make sure you only use 1 cup. If you are making the soup, throw that whole damn can in)

1/4 cup Nutritional Yeast (Thug Kitchen calls it nooch.. it adds the cheesey flavor to most vegan dishes)

2 cloves garlic (mince that shit)

2 jalapenos (you can use one if you are a wuss)

Some lime juice

A touch of salt

First you need to blend up your butternut squash puree and onion. You can do this in a blender. We are not yet professional home cooks and used my Nutribullet instead. It was messy, but it worked.

In a small bowl, mix together your flour and all your spices (cumin, chili powder, and smoked paprika)

Next, take a medium soup pot, or any pot that will look like it holds a ton of queso, and warm up your olive oil over medium heat. Add your flour mixture until it starts to thicken up. Then slowly whisk in the veggie stock and it will start to look kinda funky and chunky. Now here’s where you can go queso or go soup. Add you diced tomatoes. The amount you add is crucial. Add one cup if you are making the queso. Add an entire freaking can to make your soup. Your mixture should start to smooth out a bit.

Finally, pour in your butternut squash/onion mix along with everything else. Including the nutritional yeast, garlic, jalapenos, lime juice, and salt. Stir that shit up well. Reduce the heat to low and let your tasty concoction simmer for about 5 minutes. Make sure it tastes to your liking and add what you see fit. Voila. Queso/soup. Now make your crunchwrap and dip that shit all up in it.


Crunchwrap (this is so simple you will wonder why you have only been eating tacos on Taco Tuesday)

Ingredients

1 can of your fave vegan refried black beans

Big ass wheat tortillas (the biggest you can find)

Tostadas

1 avocado

1 tomato

1/2 white onion

1/2 jalapeno

Cilantro

Some lime juice

Salt and pepa

Optional: vegan sour cream. I might try to add some cashew cheese from Cultured Kitchen next time.

First, heat up your beans a little in a pot on the stove. Not too hot because they will be cooking again in your crunchwrap. While those are heating up, throw together your quasi pico de gallo. Dice your tomato and avocado and throw that in to a bowl. Then chop up your onion, jalapeno, and cilantro and add those as well. Stir it all together with some lime juice, salt and pepa, and boom. You’ve got a pico.

Now assemble. Lay out your big ass tortilla on a large plate. On the bottom add a layer of your warm refried beans. On top of that, add one tostada. Here is when you can get creative. We’ve added a creamy avocado/lime mix on top of the tostada and I just had the brilliant idea to add cashew cheese. Get something creamy in there, if you please. Or keep it simple and go ahead and add your pico. This is the tricky part, the fold. You are going to need to try to fold in one side at a time keeping all that tasty shit inside your big ass tortilla. Once you think you’ve got a handle on it, double check again because it might fall apart. Then, once you really think it’s secure, throw that monster fold side down on a George Foreman or panini press of some sort. I’m sure you could also throw it on a pan on the stove like a quesadilla, but I haven’t tried that yet. Let me know if you do!

Anyways, grill it up until it browns on both sides and you get those pretty George grill lines. Take it off the grill and back on your plate. Top it off with a little extra pico and get your queso ready for dipping. Dig in!


Hash N Gravy

Before I started a vegan diet, savory breakfasts were my thing. Eggs, bacon, sausage, cheese… all of it. Now, since I have been eating vegan, I’ve been craving that savory breakfast outside of my Everyday Smoothie (to be shared soon) and granola. So here we are with some hella tasty Hash N Gravy. Who would have thought you could make a bomb ass VEGAN gravy?!?! Well I didn’t. But you can. It’s defnitely not like Grandma’s breakfast gravy but it totally does the trick and fills that savory breakfast void of mine.

Hash N Gravy (for 2 with some leftovers)

Ingredients

Half of a white onion

One bell pepper (color of your choosing – I like red or green)

One big ass clove of garlic

Half of a sweet potato

Half of a regular potato

(OR one whole sweet potato OR one whole regular potato – whatever you want – idc)

Salt, pepper, red pepper, oregano

We will start with the hash because that shit takes longer than you think. Especially if you are using sweet potatoes, those suckers are hard! Anyways, chop up your half onion (google how to chop an onion, it will save your life). Add that in a pretty big pan with a little bit of water or olive oil. Let your onion become translucent, as they say. While it is translucenizing, dice up your bell pepper and mince your garlic. Throw all that in with your onion and cook until you start smelling those tasty fragrances. While that’s all fragranizing, dice up the potatoes that you chose into cute little squares. Add your potatoes to the pan and season it up! I like to add salt, pepper, a little red pepper flakes for heat, and some oregano. But you can mix it up and add other seasonings that you enjoy on potatoes as well. Those will have to cook for up to 2 minutes, until the potatoes are tender and you can fork em.

Now on to the gravy. I tried a recipe yesterday that just called for almond milk and flour whisked together and cooked. Don’t do that. It got all gummy and weird. Follow these directions instead. You’ll thank me. You can cook this up while your hash is taking a million hours to get tender. Here is what you will need:

Vegan sausage – my favorite is Lightlife Gimme Lean Meatless Sausage

1/4 cup oil – I used vegetable oil. Cause. Vegetables.

1/4 cup flour

2 cups UNSWEETENED almond milk (Also don’t make my mistake and use sweet coconut milk.. that was weird)

Some salt and LOTS of pepper

First, you will need to cook up your favorite vegan sausage until it starts browning in a pan. Make sure it is all crumbled up in to bite sized tasty little nuggets. Then set it aside. That was easy.

NOW, in that same pan, add your oil and stir in the flour over low heat. Also add some pepper at this point as well. Continue stirring your oil flour mixture until it starts to turn kind of light brown and looks creamy. Then, slowly add your UNSWEETENED almond milk (can’t stress that enough.. the coconut milk was really strange). Keep slowly adding and stirring in your milk until you mixture is super creamy and consistent. Basically until it looks like some bomb ass breakfast gravy. Taste it. Add some salt and maaayyybbbeee more pepper. Now you can add your crumbled up cooked vegan sausage and stir it all together for a few minutes to marry all that delish shit together.

It’s time. Time for your to enjoy your pretty healthy and tasty vegan breakfast creation. You can use a plate or bowl. In the picture the food is on a plate but I prefer a bowl. Add your hash and add some of that creamy concoction of gravy on top. Now you can customize it. What is your favorite hot sauce? Mike has become obsessed with Crystals Louisiana Hot Sauce. I’m a fan of Cholula. Just don’t use Tapatio unless you want your entire meal tasting like Tapatio. And I know you don’t. Now stuff your face!


BBQ Brussels Sprout Sando

I LOVE BRUSSEL SPROUTS! I can’t say it enough. I love them. So I don’t know why I never thought to put them between two yummy buns and eat that shit up. No clue. But the other day it hit me.. Make a brussel sprout sandwich. But that’s too easy. Make a BBQ brussel sprout sandwich. Now were talking.

I always try to get creative with lunches because salads get so damn boring and sometimes you want something fresh, not leftovers from the night before. Lucky for me, I have the flexibility and time to try new things at lunch time (I work from home). So behold, my first recipe shared, and one all my own. It’s so easy so it’s not that impressive, but if you are looking to try new lunch/dinner items too, try this!

BBQ Brussel(s?) Sprout Sando

Ingredients:

Brussel sprouts (duh!) – maybe like 2 or 3 cups depending on how many sando’s you’re making. Don’t do what I did and buy the pre-cut ones because that is laziness (don’t judge me)

Olive Oil – just a scosh

Salt & Pepa for taste (and maybe a little red pepper flake)

Your fave BBQ sauce (mine is Sweet Baby Rays.. just make sure that shit is vegan)

Avocado

Arugula

Mike’s Swanky Ass Sauce #1 (more recipes to come) – Mix togehter a tbs. vegan mayo, tbs. ketchup, some dill relish, some dijon mustard, splash of sriracha (I like the spice), tsp. of garlic powder

OH! And some wheat bunzzz.

Preheat your oven to 400 degrees. I’m always too impatient to wait for it to preheat so I end up throwing what ever in there when I’m ready. It still cooks. While you are waiting a decade for your oven to preheat, chop up your brussels in to bite-sized pieces and put them in a bowl (do not just throw some already chopped brussels in a bowl because that is just lazy.. don’t judge me). Toss your brussels in just a little bit of olive oil, salt, pepper, and a touch of red pepper flakes. Throw those in your almost preheated oven for 20 minutes, checking on them and shifting them around half-way through.

While those puppies are cooking, throw together your Swanky Ass Sauce (see above), or another yummy sauce or topping of your choosing. We will be sharing some delish sauces soon. All about that flavor combo. You can also toast your bunz at this time, if you please.

Your brussels should be tender so if they need a few more minutes, all good. When they are done, take them out of the oven and throw them back in to the same bowl they were in before you put them in the oven. I’m saving you on dishes here. You’re welcome. Then add some of your favorite BBQ sauce and get them all sauced up.

Sando… ASSEMBLE! Place your tasty ass BBQ brussels on the bottom bun, then add your arugula, then avocado, and your Swanky Ass Sauce to the top bun. Squish it together, make it look kind of fancy but still messy, snap a pic, post it to your IG story, caption it, find a good filter, share it, and then… Enjoy!


Blogging is hard… but Vegan is fun!

Yep! I did it. I made that drastic lifestyle change to the plant-based diet. But how drastic did it have to be? Was I really that limited on what I could eat? Was I only going to eat fruits and vegetables? Turns out.. you don’t!

Like many new vegans, I made the switch after watching the notorious Netflix documentary, What the Health (thanks Kip), and then started educating myself even more. What were the benefits of a plant-based diet? What were some of the risks continuing to consume meat and dairy? Turns out (surprise, surprise) the benefits overwhelmingly outweighed the risks. It is September and I have been more conscious about my food choices for the last 2 months. That doesn’t mean to say I’ve been very strict and that I haven’t slipped up once or twice, but I do feel amazing! Food isn’t weighing me down anymore and making me feel heavy. The best way I can explain the change I feel is that I feel light! Although I’ve only lost a few lbs (thanks brewery rep fiance Mike), I feel amazing!

Before making the switch, I was eating an animal protein with almost every meal. Eggs with breakfast, chicken with lunch, turkey with dinner, and all the CHEESE in between. Mike and I were self-proclaimed chefs and always liked to try new things and get creative in the kitchen. But how could we move that creativity to using only plants?! It was much easier (and more fun) than we had thought. Every week we look though our recipes or at dishes we have made before and think of how we can spice it up and make it our own. In the past 2 months, I have enjoyed cooking more than I ever have before! And we aren’t missing out on anything that you meat eaters have because, more likely than not, we can make something similar that tastes better. Sorry not sorry.

I’ve been sharing photos of my yummy dishes on my Instagram captioning “New vegan dish alert!” (probably annoying all my carnivore followers.. again.. sorry not sorry). So many people have been asking me for recipes and to see more that I’ve decided to start this blog to share all of our delicious creations. I’m definitely no blogger, so bare with me as I try to explain food and write out recipes. No joke, this blogging thing is hard. I already got writers block on my first post. Pft. BUT vegan is fun which will make sharing all of this Pretty Healthy And Tasty vegan food so easy! Stay tuned for more foods and thanks for watching…